Documentation

Data Import


Integrating your products in ChannelBuddy

Bevor du deine Produktdaten mit ChannelBuddy in den unterschiedlichsten Kanälen ausspielen kannst, ist es notwendig, die Artikeldaten in ChannelBuddy zu integrieren.

Diese kommen normalerweise aus deinem Shop, ERP System oder aus einem PIM (Produktinformationsystem). Sofern du die Verbindung zu einem dieser Systeme oder zu einem Export aus einem dieser Systeme noch nicht hergestellt hast, kannst du dies im Menüpunkt unter Einstellungen->Setup nachholen.

Before you can distribute your product data through ChannelBuddy to various channels, it is necessary to integrate the articles data into ChannelBuddy.

Typically, this data comes from your shop, ERP system, or a PIM (Product Information Management) system. If you haven’t established the connection to one of these systems or an export from one of these systems yet, you can do so in the Settings -> Setup section.

This guide assumes that the previous step has already been completed.

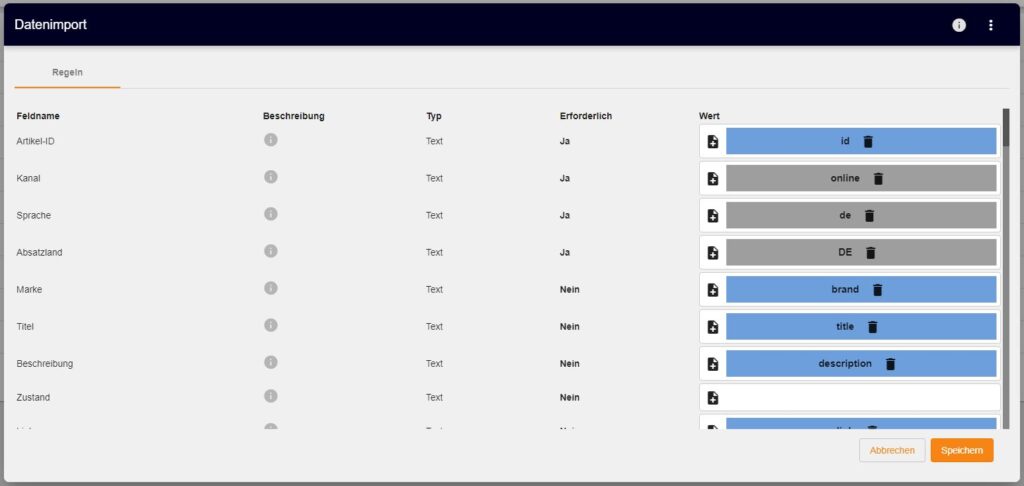
Now, go to Data Integration and click on the Data Import button. A dialog box will open, allowing you to create a mapping that connects the fields from the data source to ChannelBuddy.

Create your mapping in the Rules

On the left, you will see the different field names that can be populated in ChannelBuddy. Additionally, you will see their descriptions, data types (text or number), and whether the field is required.

Required fields ensure the uniqueness of the items. With ChannelBuddy, it is possible to distribute items across multiple countries, languages, and channels. Therefore, item uniqueness is defined by the following attributes:

  • ArtikelId
  • channel
  • contentLanguage
  • targetCountry

To map a field, click on the „+“ symbol on the right side of the respective field. A context menu will appear, offering several options for defining the field. You can select a field or attribute from the data source (available in the premium version only). If you want to enter a constant text value, you can do so using the „Text“ field. If you don’t need to differentiate based on language, country, or channel, you can set a default value for each field.

The „Script Editor“ option allows you to manipulate and combine fields freely, providing the most flexibility in defining your fields. Click on „Script Editor“ in the context menu to open the Script Editor.

Click here to access detailed documentation on the Script Editor.


2. Subfeeds

Subfeeds allow you to quickly and easily modify or supplement your existing main feeds. Subfeeds cannot be used as the main data source.

To create a subfeed, open the data integration section. Under „Subfeeds,“ your existing subfeeds will be displayed. Click on the „Add Subfeed“ option to create a new subfeed easily.

Your subfeed needs a name that you can freely choose. Make sure the name is descriptive enough to identify the feed easily.

Provide your Spreadsheet ID to grant access to s4pgooglesheets@solutions4performance.de for your spreadsheet. You can find the ID in the link of your spreadsheet. For example: https://docs.google.com/spreadsheets/d/1d0Eg3L7Zftn380J81WPVjItdIiUfxneXKar4wlIu8EQ/edit?usp=sharing

Next, select an update type. With „Update,“ no new items will be added if they are not found. With „Update Insert,“ new products will be added if specific products are not found.

Use our subfeed template to customize your data in ChannelBuddy.

https://docs.google.com/spreadsheets/d/1d0Eg3L7Zftn380J81WPVjItdIiUfxneXKar4wlIu8EQ/edit?usp=sharing

Noch weitere Fragen?

Dokumentation

In der Dokumentation erfährst du alles zur Einrichtung von Channelbuddy und erfolgreichen Nutzung unseres Feed-Management-Tools.

FAQ

In unserem FAQ beantworten wir dir die häufigsten Fragen zu unserem Feedmanagement-Tool und zur Einrichtung von ChannelBuddy.